Mastering CATV Hardline Connectors: A Technician's Guide to Installation, Maintenance, and Troubleshooting
- Share
- Issue Time
- Jun 6,2026
Summary
This guide covers CATV hardline connector installation steps, daily maintenance rules and common troubleshooting methods, helping technicians ensure stable signal transmission and extend connector service life.
Introduction: The Critical Role of Hardline Connectors
In the world of CATV (Community Antenna Television), the integrity of the network is only as strong as its weakest link. More often than not, that weak link is a poorly installed or maintained hardline connector. These components are the critical junctions in the trunk and feeder lines that deliver high-frequency signals from the headend to the subscriber. Even a single faulty connector among the hundreds in a network can degrade performance, cause signal leakage, and lead to costly service calls and dissatisfied customers. Therefore, mastering the art and science of hardline connector installation and maintenance isn't just a technical skill—it's a cornerstone of network reliability and operational efficiency.
Understanding the Anatomy of a Hardline Connection
Before diving into maintenance, it's crucial to understand what makes a solid hardline connection. A typical hardline coaxial cable consists of a center conductor (usually copper-clad aluminum), a dielectric insulator, a seamless aluminum outer conductor (sheath), and a protective outer jacket. The connector's job is to create a secure, continuous, and environmentally sealed path for the signal between the cable and equipment like amplifiers, taps, or other cables. This involves multiple-piece P3 or QR connectors designed to grip the outer and inner conductors perfectly, ensuring both mechanical stability and electrical integrity. A failure in any part of this assembly can compromise the entire system.
The Essential Toolkit: Why Proper Tools are Non-Negotiable
Attempting to install or service hardline connectors without the correct- tools is a recipe for disaster. The precision required cannot be achieved with standard hand tools. Using worn, damaged, or incorrect equipment is a primary cause of installation failures. A technician's toolkit must include specialized, well-maintained instruments.
| Tool | Purpose |
|---|---|
| Hardline Cable Cutter | Provides a clean, square cut without deforming the cable's round shape. |
| Jacket Stripping Tool | Precisely removes the outer polyethylene jacket to the exact length required. |
| Coring Tool | Simultaneously strips the aluminum sheath and removes the dielectric to expose the center conductor. |
| Center Conductor Cleaner | Scrapes away any remaining dielectric residue without scoring the conductor. |
| Torque Wrench | Ensures the connector is tightened to the manufacturer's precise specifications for a weatherproof seal. |
Using a dull coring bit, for example, can leave score marks on the center conductor, leading to signal transmission issues and creating weak points susceptible to future failure.
Step-by-Step Installation: A Best-Practice Guide
While specific instructions may vary slightly between manufacturers like PPC or Amphenol, the fundamental process for a perfect installation is universal. Following these steps meticulously is key to long-term network health.
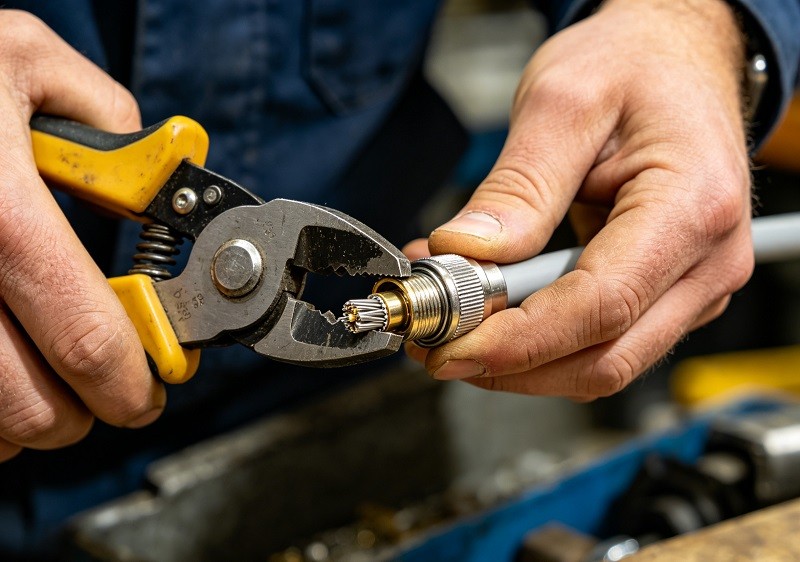
- Clean Cut: Start with a perfectly square cut using a dedicated hardline cable cutter. A distorted cable end will not seat correctly in the connector.
- Jacket Stripping: Use a jacket stripping tool to remove the outer jacket to the length specified in the connector’s instructions.
- Coring the Cable: Employ the correct coring tool for the cable type (e.g., P3, QR). This critical step cuts the aluminum sheath and removes the foam dielectric to the proper depth.
- Cleaning the Conductor: Thoroughly clean the exposed center conductor to remove all dielectric residue. A specialized cleaner is best; never use a knife, which can score the conductor.
- Connector Assembly: Slide the connector components onto the prepared cable. Ensure the back nut is on first.
- Tightening: This is a critical step. Hand-tightening is never sufficient. Use a torque wrench to tighten the connector until it reaches the manufacturer's specified positive stop. This creates the secure, moisture-proof seal that is vital for longevity.
Troubleshooting Common Connector Failures
When problems arise, a systematic approach to troubleshooting is essential. Most connector-related issues fall into a few common categories.
- Visible Damage: Always start with a visual inspection. Check for cuts, kinks, or crushed sections of the cable near the connector.
- Loose Connections: Connections can become loose over time due to thermal expansion/contraction or vibration. A loose connection is a major source of signal loss and ingress.
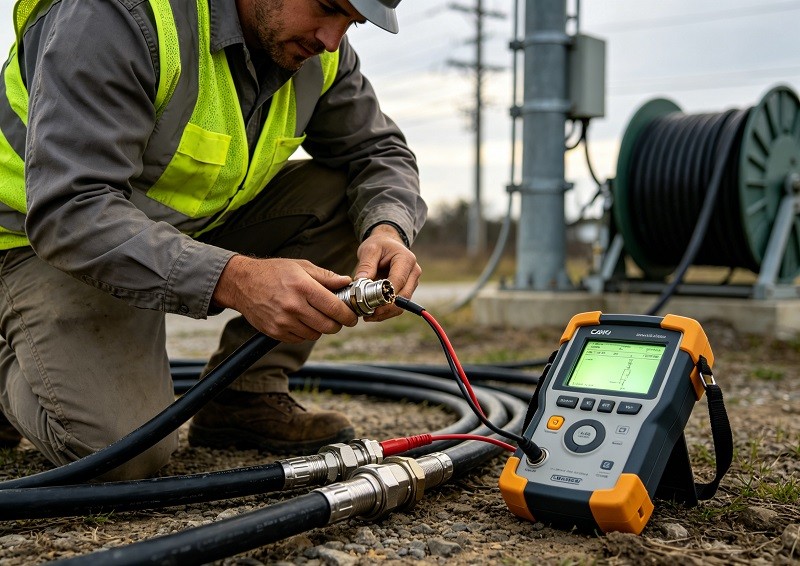
- Signal Measurement: Use a signal level meter to check for signal loss or anomalies at the connector. Testing at various points can help isolate the faulty component.
The #1 Enemy: Moisture Ingress and Corrosion
Moisture is the number one cause of connection problems in a CATV network. Once water penetrates a connector, it begins a destructive cycle. It can cause the aluminum components to corrode, creating a rusty or greenish residue. This corrosion not only impedes the signal path, causing significant loss and intermittent service, but can also lead to short circuits and equipment failure. A properly tightened connector with an intact weather seal is the first line of defense. For added protection, heat-shrink tubing should be applied over the finished connection to create an additional environmental barrier.
Signal Leakage and RFI Integrity
An improperly sealed connector doesn't just let things in; it lets signals out. This is known as signal leakage or egress. Not only does this violate FCC regulations, but it also creates an entry point for outside interference to get in (ingress). Radio Frequency Interference (RFI) from sources like LTE signals, electrical motors, or fluorescent lights can contaminate the signal, leading to pixelation, slow internet speeds, and poor voice quality. Maintaining tight, 360-degree contact within the connector is essential for preserving RFI integrity.
The Perils of Incorrect Coring and Conductor Length
Precision during the cable preparation phase is paramount. If the coring tool is pushed too deep or not deep enough, it results in an incorrect center conductor length. A conductor that is too short will not make proper contact inside the equipment port, leading to a weak or non-existent connection. A conductor that is too long can be damaged when seated and can create signal reflections. Similarly, the "stinger" or pin length must be trimmed precisely according to the equipment manufacturer's guide marks. The common practice of making a chisel or diamond point cut helps guide the conductor into the seizure mechanism without damage.
Proper Tightening: More Than Just 'Hand-Tight'
One of the most frequent and damaging mistakes made during installation is improper tightening. "Hand-tight" is never sufficient for a hardline connector. These connectors are designed to be tightened with wrenches to a specific torque value or until they hit a "positive stop." This process compresses the internal seals and creates a uniform grip on the cable, ensuring a robust physical and electrical connection. Under-tightening leaves the connection vulnerable to moisture and signal ingress, while over-tightening can damage the connector threads or the equipment port itself.
Routine Maintenance and Preventative Checks
Preventative maintenance is far less costly than emergency repairs. Network operators should implement a schedule for routine checks, especially in areas with harsh environmental conditions. This can include:
- Visual Inspections: Regularly look for physical damage, corrosion, and signs of weather-seal degradation.
- Torque Checks: Periodically verify that connectors on outdoor equipment remain tightened to specification.
- Signal Sweeping: Running a system sweep can help identify low-level issues like signal reflections or minor ingress before they become service-impacting problems.
- Leaving a Service Loop: When installing, leaving a small, properly coiled loop of cable near the connector provides slack for future repairs or replacements without having to splice in a new cable section, which can be a common point of failure if not done correctly.
Conclusion: The Foundation of Network Reliability
In the competitive landscape of broadband services, network reliability is a key differentiator. Mastering the maintenance and troubleshooting of CATV hardline connectors is fundamental to achieving that reliability. By investing in proper tools, comprehensive technician training, and adhering to best-practice installation procedures, network operators can significantly reduce service calls, minimize signal leakage, and prevent the costly, cascading failures that stem from a single bad connection. Ultimately, a well-maintained hardline plant is the foundation upon which a high-performance, profitable, and customer-pleasing network is built.