A Guide to Manufacturing Custom Plastic Injection Molding Parts
- Share
- Issue Time
- Mar 4,2026
Summary
Explore the complete guide to manufacturing custom plastic injection molding parts. Learn about mold design, production processes, material selection, and strict quality control standards.
As experts in the field, we understand the critical role that Plastic Injection Molding plays in modern manufacturing. From intricate medical devices to robust automotive components, virtually every plastic item we encounter daily has likely benefited from this versatile process.
Custom plastic injection molding parts are essential for many industries, offering unparalleled precision, cost-effectiveness for large production runs, and a wide array of material options. This guide will walk you through the world of custom plastic injection molding, exploring its processes, benefits, and why it might be the perfect solution for your next project.
Understanding the Fundamentals of Custom Plastic Injection Molding Parts
To fully appreciate the value of custom plastic parts, it's essential to start with the basics. This foundational knowledge will help you understand why this manufacturing process is a preferred choice for projects demanding precision, durability, and scalability. We'll delve into the core concepts, highlight its significant advantages, and compare it to other common manufacturing techniques.
What is Custom Plastic Injection Molding?
At its core, custom plastic injection molding is a manufacturing process for creating plastic parts by injecting molten material into a specially designed mold. This technique is renowned for its ability to produce large quantities of identical parts with high precision and consistency. The "custom" aspect refers to the mold itself, which is engineered and built to the exact specifications of a particular component, allowing for the creation of unique products tailored to specific needs.
The process begins with plastic pellets, which are fed into a heated barrel in the injection molding machine. Inside the barrel, a reciprocating screw melts the plastic through a combination of applied heat from heater bands and shear heat from the screw's rotation. This ensures the plastic becomes a homogenous molten liquid. Once the material reaches the correct temperature and consistency, the screw injects it under high pressure through a nozzle and into the mold. The molten plastic fills the internal cavity of the mold, which is the negative of the part to be created.
After the injection phase, the part is allowed to cool and solidify within the mold, which often contains internal cooling lines to maintain a constant temperature and speed up the cycle. Once the part is sufficiently hardened, the mold opens, and the part is pushed out by ejector pins. The entire cycle—from mold closing to part ejection—can be highly automated and repeated rapidly, making it a cornerstone of mass production.
The injection molding machine itself is a complex piece of equipment with three main units working in harmony:
- The Injection Unit: This is responsible for melting and injecting the plastic. It consists of the hopper (which holds the raw plastic pellets), the barrel, and the reciprocating screw.
- The Clamping Unit: This unit holds the two halves of the mold together with immense force during the injection and cooling phases, preventing the high-pressure plastic from seeping out. It then opens the mold for part ejection.
- The Control Unit: This is the brain of the machine, a PLC (Programmable Logic Controller) that automates the cycle and monitors all parameters like temperature, pressure, and timing to ensure consistency.
Key Advantages of Custom Plastic Injection Molding Parts
Custom plastic injection molding is a preferred manufacturing method across countless industries for a reason. It offers a powerful combination of efficiency, precision, and flexibility that is difficult to match. The key benefits stem directly from the nature of the process itself.
| Advantage | Description |
|---|---|
| High Precision & Complex Geometry | The extremely high pressure used in injection molding forces the molten plastic into every detail of the mold cavity. This allows for the creation of incredibly complex and intricate parts with tight tolerances that can be consistently maintained across millions of cycles. |
| Efficiency and Speed | Injection molding cycles are very short, often lasting between 15 to 120 seconds. This rapid production capability means more parts can be manufactured in less time, making it exceptionally efficient for high-volume runs and accelerating time-to-market. |
| Cost-Effectiveness at Scale | While the initial investment in tooling (creating the mold) can be significant, the cost per part becomes extremely low as production volume increases. The highly automated nature of the process also reduces labor costs, further enhancing its economic advantage for mass production. |
| Material Variety and Color Flexibility | An extensive range of thermoplastic polymers—over 25,000 engineered materials—can be used, each with unique properties. Materials can be selected for strength, flexibility, chemical resistance, and more. Furthermore, colorants can be mixed directly with the resin, allowing for parts to be produced in virtually any custom color without needing secondary painting. |
| Enhanced Strength and Lightweighting | The process allows for the inclusion of fillers within the plastic resin, which can enhance the strength and stiffness of the final part. Additionally, modern high-performance plastics can often replace metal components, offering comparable strength and durability at a significantly lower weight, which is a critical advantage in industries like automotive and aerospace. |
| High Repeatability and Consistency | Once the mold is created and the process parameters are set, injection molding produces virtually identical parts, cycle after cycle. This high degree of repeatability is crucial for industries where part consistency is non-negotiable, such as in medical devices and electronics. |
| Low Waste | Injection molding is a highly efficient process with minimal material waste. Excess material from the runners, sprues, and gates, as well as any rejected parts, can often be reground, recycled, and reused in the process, contributing to a more sustainable manufacturing cycle. |
| Excellent Surface Finish | Parts emerge from the mold with a finished appearance that often requires little to no post-production work. A wide variety of surface finishes, from high gloss to matte or textured, can be incorporated directly into the mold, saving time and money on secondary finishing operations. |
Injection Molding vs. Other Plastic Manufacturing Methods
Choosing the right manufacturing process is critical to the success of a product. While injection molding is incredibly versatile, it's not the only way to produce plastic parts. Understanding its strengths and weaknesses compared to other popular methods like CNC machining and 3D printing is crucial for making an informed decision.
The following table provides a comprehensive comparison of these three major plastic manufacturing methods:
| Feature | Plastic Injection Molding | CNC Machining | 3D Printing (Additive Mfg.) |
|---|---|---|---|
| Process | Additive/Forming: Molten plastic is injected into a mold to form a part. | Subtractive: A solid block of plastic is cut and shaped by removing material. | Additive: A part is built layer-by-layer from a digital file. |
| Best For Volume | High Volume (10,000+ parts): Extremely low cost-per-part at scale. | Low to Medium Volume (1-1,000s): Ideal for prototypes and small production runs. | Very Low Volume (1-100s): Perfect for one-off custom parts and prototypes. |
| Initial Cost | High: Requires significant upfront investment to create a durable steel or aluminum mold. | Low: No tooling required. The main costs are material and machine time. | Very Low: No tooling costs, making it highly economical for single parts. |
| Cost Per Part | Very Low: Decreases dramatically as production volume increases. | Medium to High: Remains relatively constant regardless of volume. | High: Cost per part is high and doesn't decrease significantly with volume. |
| Lead Time | Long: Mold fabrication can take weeks or months before production begins. | Fast: Parts can be produced quickly, often in a matter of hours or days, directly from a CAD file. | Very Fast: The fastest method for producing a single prototype, often within hours. |
| Design Complexity | High: Can produce very complex, three-dimensional shapes and detailed features. However, design is constrained by mold-making rules (e.g., draft angles, no undercuts without complex actions). | Moderate: Limited by tool access. Deep pockets or internal features can be difficult or impossible to machine. | Very High: Offers almost complete design freedom. Capable of creating incredibly complex geometries and internal lattice structures that are impossible with other methods. |
| Material Options | Vast: A huge selection of thermoplastic resins is available with a wide range of properties. | Wide: Works with a broad range of machinable plastics, including some that are not suitable for injection molding. | Limited: The selection of materials is more restricted compared to injection molding, though it is rapidly expanding. |
| Part Strength | Excellent: Parts are formed from a single, continuous melt, resulting in strong, isotropic properties. | Excellent: Parts retain the full strength of the solid block of material from which they are cut. | Good to Fair: The layer-by-layer construction can create anisotropic properties, meaning the part is weaker along the layer lines. |
| Surface Finish | Excellent: Can achieve a variety of finishes from high-gloss to textured, directly from the mold. | Good to Excellent: Can have visible tool marks but can be post-processed for a very smooth finish. | Fair to Good: Layer lines are often visible, and surfaces typically require post-processing like sanding or smoothing to achieve a fine finish. |
| Material Waste | Low: Excess material (runners) can be reground and recycled into the process. | High: As a subtractive process, it generates a significant amount of waste material (chips). | Very Low: Only the material needed for the part and its supports is used. |
In summary:
- Choose Injection Molding for high-volume production runs where consistency and low per-part cost are paramount.
- Choose CNC Machining for high-precision, low-to-mid volume parts made from a wide variety of materials, especially when strength is critical.
- Choose 3D Printing for rapid prototyping, highly complex and custom one-off parts, and when design changes are frequent.
The Comprehensive Seven-Step Process for Custom Plastic Injection Molding Parts
Achieving high-quality custom plastic parts is not a simple task; it is a meticulous, multi-stage journey that demands expertise and precision at every turn. This comprehensive seven-step process outlines the path from initial concept to final production, ensuring that every detail is considered and every part meets the required specifications for performance, quality, and cost-effectiveness.
Step 1: Design and Engineering for Custom Plastic Injection Molding Parts
The success of any injection molded part is largely determined before a single gram of plastic is ever melted. The initial design and engineering phase is arguably the most critical step, as it lays the foundation for a part that is not only functional but also manufacturable, cost-effective, and reliable. This stage is governed by the principles of Design for Manufacturability (DFM).
DFM is a proactive approach that integrates manufacturing process considerations directly into the part design. The goal is to optimize the design to avoid potential problems like defects, high costs, and production delays. For injection molding, engaging with manufacturing experts early in this phase is crucial, as an estimated 70% of a product's manufacturing cost is determined by design decisions.
Key DFM considerations include:
Uniform Wall Thickness: This is one of the most fundamental rules in injection molding design. Walls with consistent thickness allow the molten plastic to flow evenly and cool at a uniform rate.
- Why it's important: Non-uniform walls lead to differential cooling and shrinkage, which can cause defects like sink marks (depressions on the surface opposite a thick section), voids (internal bubbles), and warpage (twisting or bending of the part).
- Best Practices: Design walls to be as thin and uniform as possible while still meeting strength requirements. If thicker sections are unavoidable, the transition from thin to thick should be gradual. Instead of designing a single thick wall for strength, it is often better to use a thinner nominal wall reinforced with strategically placed ribs.
Draft Angles: A draft angle is a slight taper applied to the vertical faces of a part, preventing them from being parallel to the direction of mold opening.
- Why it's important: As the plastic part cools, it shrinks and grips onto the mold core. Without a draft angle, this creates significant friction during ejection, which can lead to scratches, scuffs, or drag marks on the part's surface. In severe cases, it can damage the part or even the mold itself.
- Best Practices: A standard rule of thumb is to apply a minimum of 1 to 2 degrees of draft per side. Surfaces with heavy textures require more draft—sometimes 3 degrees or more—to prevent the texture from being scraped off during ejection.
Ribs and Gussets: Ribs are thin, wall-like features used to add strength and stiffness to a part without increasing overall wall thickness. Gussets are supportive features, often triangular, that reinforce areas like walls and bosses.
- Why it's important: They provide structural integrity while minimizing material usage, reducing cycle times, and preventing defects like sink marks that would occur with thick, solid sections.
- Best Practices: The thickness of a rib should generally be 40-60% of the nominal wall thickness to avoid creating sink marks on the opposite surface.
Radii and Fillets (Avoiding Sharp Corners): Sharp internal corners are sources of high-stress concentration, which can make a part prone to cracking under load.
- Why it's important: Sharp corners also impede the flow of molten plastic, potentially causing incomplete filling. Adding rounded edges (fillets and radii) reduces stress and improves material flow.
- Best Practices: A radius of at least 0.5 times the wall thickness is a good general guideline to reduce stress and enhance flow.
Undercuts: An undercut is a feature that prevents the part from being ejected directly from the mold, such as a side hole or a snap-fit clip.
- Why it's important: These features require more complex and expensive mold mechanisms, like side-actions or lifters, which add to tooling cost and cycle time.
- Best Practices: Whenever possible, designs should be modified to eliminate undercuts. If they are essential to the part's function, collaborating with the mold maker is crucial to find the most efficient tooling solution.
By diligently applying these DFM principles using CAD software and collaborating closely with an experienced Injection Molding Parts Manufacturer, potential manufacturing issues can be identified and resolved on-screen, saving immense time and cost compared to fixing them after the steel mold has been cut.
Step 2: Material Selection for Optimal Custom Plastic Injection Molding Parts
Choosing the right material is a pivotal decision that directly influences the part's performance, durability, aesthetics, and cost. With thousands of plastic resins available, a systematic approach is necessary to narrow down the options to the one that best fits the application's unique requirements.
First, it is essential to understand the two main categories of plastics used in injection molding: thermoplastics and thermosets.
- Thermoplastics: These are the most commonly used polymers in injection molding. Their defining characteristic is the ability to be melted, solidified, and then re-melted multiple times without significant chemical degradation. This makes them highly recyclable and easier to process. Common thermoplastics include ABS, Polycarbonate, and Nylon.
- Thermosets: Unlike thermoplastics, thermosets undergo an irreversible chemical reaction (cross-linking) when heated and cured. Once they solidify, they cannot be re-melted. This process results in materials with excellent high-temperature stability and chemical resistance, but they are not recyclable. Epoxy and phenolic resins are examples of thermosets.
When selecting a material, a number of key factors must be carefully weighed:
Mechanical Requirements: This considers the physical stresses the part will endure. Key properties include:
- Tensile Strength: The part's resistance to being pulled apart.
- Impact Resistance (Toughness): The ability to withstand sudden shocks without fracturing. Materials like Polycarbonate (PC) are known for their high impact strength.
- Hardness: Resistance to surface indentation and scratching.
- Flexibility vs. Rigidity: Whether the part needs to bend (like a clip) or remain stiff.
Thermal Properties: This is critical if the part will be exposed to varying temperatures. The Heat Deflection Temperature (HDT) is a key metric, indicating the temperature at which a material begins to deform under a specific load. High-performance plastics like PEEK are chosen for high-heat applications.
Chemical and Environmental Resistance: The operating environment will dictate material choice. Will the part be exposed to oils, acids, cleaning solvents, or other chemicals? Will it be used outdoors, requiring resistance to UV radiation and moisture? Materials like Polypropylene (PP) have excellent chemical resistance, while ASA (Acrylonitrile Styrene Acrylate) is a go-to for outdoor applications due to its superior UV stability.
Aesthetic Requirements: The desired look and feel of the part are crucial, especially for consumer products. Considerations include:
- Color: Can the material be easily color-matched?
- Transparency: Does the part need to be clear, like a lens? Acrylic (PMMA) and Polycarbonate (PC) offer excellent clarity.
- Surface Finish: Can it achieve a high-gloss, matte, or textured finish? ABS is known for providing a high-quality surface finish.
Regulatory Compliance: For industries like medical, aerospace, or food and beverage, materials must meet strict regulatory standards. This could include FDA approval for biocompatibility, RoHS compliance for electronics, or specific flammability ratings.
Cost: Material costs can range from inexpensive commodity plastics to very expensive high-performance polymers. The goal is to select the most affordable material that meets all the performance requirements of the part.
Here is a table of some of the most common thermoplastics used in injection molding and their characteristics:
| Material | Key Properties | Common Applications |
|---|---|---|
| Acrylonitrile Butadiene Styrene (ABS) | Good impact strength, stiffness, and surface finish; cost-effective. | Electronic housings (keyboards, printers), automotive dashboard components, LEGO bricks, phone cases. |
| Polycarbonate (PC) | Excellent impact resistance, high strength, good clarity, and temperature resistance. | Eyewear lenses, medical devices, automotive components, protective face shields, electronic enclosures. |
| Polypropylene (PP) | Lightweight, excellent chemical resistance, high flexibility, low cost, food-safe grades available. | Food containers, packaging, automotive parts, living hinges, household goods. |
| Nylon (Polyamide, PA) | High mechanical strength, excellent wear and chemical resistance, and good temperature stability. | Gears, bearings, bushings, fasteners, automotive engine components, electrical connectors. |
| Polyethylene (PE) | HDPE: High-density, stiff, strong, and chemically resistant. LDPE: Low-density, very flexible. Low cost and moisture resistant. | HDPE: Bottles, recycling bins, pipes. LDPE: Plastic bags, films, squeeze bottles. |
| Acrylic (PMMA) | Excellent optical clarity (glass-like), high tensile strength, and good UV resistance. | Lenses, light pipes, display signs, cosmetic packaging, transparent enclosures. |
| Thermoplastic Elastomer (TPE) | Rubber-like flexibility, good impact resistance, can be overmolded onto rigid plastics. | Grips and handles, seals, flexible phone cases, medical tubing. |
The selection process is a balancing act. Collaborating with material experts and the injection molder is essential to navigate the vast landscape of options and pinpoint the ideal polymer for your specific project.
Step 3: Prototyping for Precision Custom Plastic Injection Molding Parts
Before committing to the significant investment of a full-scale production mold, prototyping is an indispensable step that bridges the gap between digital design and physical reality. This crucial phase allows for the tangible evaluation of a part's form, fit, and function, enabling teams to identify design flaws, test usability, and gather stakeholder feedback early in the development cycle. Prototyping is not just about creating a model; it's about mitigating risk, reducing costs, and accelerating time-to-market.
There are several methods for creating prototypes, each with its own advantages depending on the project's goals, budget, and timeline.
1. 3D Printing (Additive Manufacturing)
For initial design verification, 3D printing is the fastest and most cost-effective method. Technologies like Fused Deposition Modeling (FDM) and Stereolithography (SLA) can produce a physical part directly from a CAD file within hours.
Benefits:
- Speed: The quickest way to get a physical model in hand.
- Low Cost: No tooling is required, making it ideal for one-off parts.
- Design Iteration: Flaws can be identified, the CAD model adjusted, and a new version printed quickly.
- Complex Geometries: Capable of producing intricate shapes that would be difficult or impossible with other methods.
Limitations:
- Material Properties: Prototypes are not made from the final production plastic, so their mechanical and thermal properties will differ.
- Surface Finish & Strength: Parts often have visible layer lines and are generally weaker (anisotropic) than their molded counterparts.
2. 3D Printed Injection Molds (Rapid Tooling)
A modern, hybrid approach involves 3D printing the mold itself rather than the part. Using high-temperature, rigid resins (like glass-filled or ceramic-filled photopolymers), it's possible to create a mold that can be used for low-volume injection molding runs.
Benefits:
- Real Materials: Allows for the production of prototypes using the actual production-grade thermoplastic. This is a massive advantage for functional and material testing.
- Faster than Metal Tooling: A 3D printed mold can be made in a matter of hours or days, compared to weeks for a metal mold.
- Cost-Effective for Low Volumes: Significantly cheaper than machining a metal mold, ideal for producing dozens to hundreds of parts.
Limitations:
- Limited Lifespan: These plastic molds wear out quickly and are typically only suitable for short runs (e.g., 50-500 shots), depending on the material and injection pressures.
- Lower Precision: They generally cannot achieve the same tight tolerances or fine surface finishes as machined metal molds.
3. Soft Tooling (Aluminum Molds)
For more robust functional testing, pilot runs, or "bridge" production, soft tooling is the preferred method. This involves CNC machining a mold from a softer material, most commonly high-grade aluminum.
Benefits:
- Speed and Cost: Aluminum is much easier and faster to machine than steel, resulting in lower upfront tooling costs and shorter lead times (often 1-4 weeks).
- Production-Quality Parts: Capable of producing thousands of high-quality parts with good surface finishes and precision.
- Faster Cycle Times: Aluminum's high thermal conductivity allows it to cool down faster than steel, which can lead to shorter injection molding cycle times.
Limitations:
- Durability: Aluminum molds are less durable than steel and are not suitable for very high-volume production (millions of parts) or for use with highly abrasive materials like glass-filled plastics.
- Repairability: While easier to modify than steel, they are more susceptible to wear and damage.
By strategically employing these prototyping methods, companies can de-risk their projects, validate designs with real-world feedback, and move to full-scale production with a much higher degree of confidence.

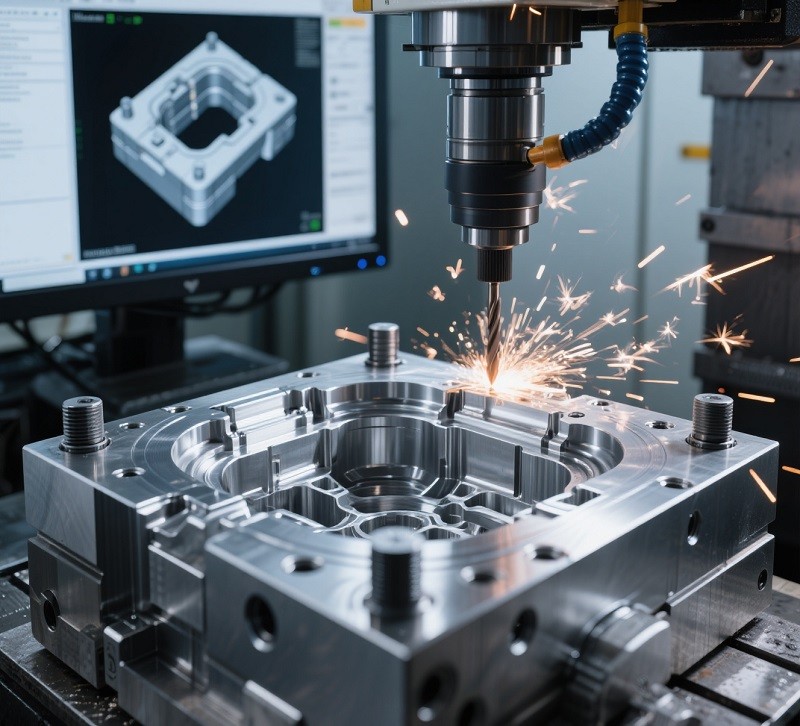
Step 4: Tooling Manufacturing for High-Quality Custom Plastic Injection Molding Parts
Once the part design is finalized and prototyped, the focus shifts to manufacturing the tool—the custom injection mold. This is a highly specialized process where a block of metal is transformed into a precision instrument capable of producing millions of identical parts. The quality and longevity of the mold are paramount to the success of the entire production run.
Anatomy of an Injection Mold An injection mold is a complex assembly of many parts, but its core function revolves around a few key components:
- Mold Base: This is the foundational structure that holds all the other components together and mounts into the injection molding machine.
- Core and Cavity: These are the two halves that form the part's shape. The cavity is the stationary half of the mold and forms the exterior, cosmetic surfaces of the part (often called the A-side). The core is on the moving half of the mold and forms the internal features of the part (the B-side).
- Sprue, Runners, and Gates: This is the delivery system for the molten plastic. The sprue is the channel that connects the molding machine's nozzle to the runners. The runners are pathways that distribute the molten plastic from the sprue to the gates, which are the small openings where the plastic enters the core and cavity.
- Ejection System: This system is responsible for pushing the finished part out of the mold after it has cooled. It typically consists of an ejector plate and ejector pins that press against the part to release it from the core.
- Cooling System: A network of channels runs through the mold, circulating a fluid (usually water) to control the temperature. Efficient cooling is critical for reducing cycle times and preventing defects like warping.
The Mold Manufacturing Process Creating the tool is a multi-step process requiring immense precision:
- Mold Design: Using the final part CAD, tool designers create a detailed 3D model of the entire mold assembly, including the core, cavity, runners, cooling channels, and ejection system. This design often includes mold flow analysis to simulate how plastic will fill the cavity, identifying potential issues before any metal is cut.
- Machining: The primary components, like the core and cavity, are machined from large blocks of metal. CNC (Computer Numerical Control) machining is used for the bulk of the material removal and to create the overall shape.
- EDM (Electrical Discharge Machining): For creating fine details, sharp internal corners, or deep, narrow features that are difficult to reach with conventional cutting tools, EDM is used. This process uses electrical sparks to erode the metal with extreme precision.
- Polishing and Fitting: The surfaces of the core and cavity that will form the part are polished to the desired surface finish. All components of the mold are then meticulously fitted together, and guide pins and bushings are installed to ensure perfect alignment between the two halves.
Mold Materials: Selecting the Right Steel The choice of mold material is a critical decision based on production volume, the type of plastic being molded, and budget.
- P20 Steel: A versatile, pre-hardened tool steel that is the workhorse for many applications. It offers a good balance of durability and machinability, making it cost-effective for low-to-medium volume production runs (typically up to 400,000 shots) and prototypes.
- H13 Steel: A very hard and durable hot-work tool steel. It must be heat-treated after machining to reach its full hardness (HRC 48-52). H13 is the standard for high-volume production (500,000 to over a million shots) and for molding abrasive materials like glass-filled plastics, due to its excellent wear and heat resistance.
- S136 Steel: A high-end stainless steel known for its excellent corrosion resistance and ability to be polished to a mirror finish. It is the required choice for molding corrosive materials like PVC or for producing optically clear parts like lenses.
Types of Molds: Cavitation The number of cavities in a mold dictates its production efficiency.
- Single-Cavity Mold: Produces one part per cycle. This is ideal for very large parts, low-volume production, or prototypes. Tooling costs are lower, but the cost per part is higher.
- Multi-Cavity Mold: Contains multiple identical cavities to produce several identical parts in a single cycle. This dramatically increases production efficiency and lowers the cost per part for high-volume runs.
- Family Mold: Contains multiple-cavity molds with different shapes. This allows for the production of all the different parts needed for a single assembly (e.g., the front and back housing of a remote control) in one shot. This can be cost-effective but is complex to design, as ensuring balanced filling for different-sized parts can be challenging.
Step 5: Production and Its Nuances for Custom Plastic Injection Molding Parts
With the precision-engineered mold mounted in the injection molding machine, the process transitions to the production phase. This is where the part design, material selection, and tooling all come together in a repeatable, high-speed manufacturing cycle. The entire process is a carefully orchestrated sequence of events, where precise control over numerous parameters is essential to produce high-quality parts consistently.
The Injection Molding Cycle Explained
The production of a single part or a set of parts is completed in one "cycle." A typical cycle is very fast, often lasting only a matter of seconds, and consists of four primary stages:
Clamping: The clamping unit of the machine pushes the moving half of the mold forward, closing it against the stationary half. A massive amount of force, known as clamping tonnage, is applied to hold the mold tightly shut, ensuring it can withstand the immense pressure of the injected plastic without any leakage.
Injection: With the mold securely clamped, the injection phase begins. Plastic pellets are melted in the machine's barrel and then forcefully injected into the mold cavity under high pressure and speed. This phase continues until the mold is about 95-99% full.
Holding & Cooling: Immediately following injection, a "holding" or "packing" pressure is applied. This maintains pressure on the material to compensate for shrinkage as the plastic begins to cool and solidify, ensuring the part is fully packed out and matches the mold's geometry precisely. Simultaneously, coolant circulates through channels in the mold to draw heat away from the part, causing it to harden. The cooling stage is often the longest part of the cycle and is critical for the part's final dimensions and stability.
Ejection: Once the part has cooled sufficiently to maintain its shape, the clamping unit opens the mold. The ejection system then activates, with ejector pins pushing the solidified part (or parts, along with the runner system) out of the mold, allowing it to fall into a collection bin. With the part ejected, the mold closes again, and the entire cycle repeats.
Nuances and Key Production Parameters
Achieving a perfect part every cycle requires the fine-tuning of numerous machine parameters. These settings are interdependent and must be optimized for the specific material, part geometry, and mold design.
- Injection Pressure: This is the force used to push the molten plastic into the mold. It must be high enough to fill the cavity completely but not so high that it creates "flash" (excess plastic seeping out of the mold's parting line).
- Melt Temperature: The temperature of the plastic as it's injected. It must be hot enough to flow easily but not so hot that it degrades the material.
- Mold Temperature: The temperature of the mold's surface, which influences the part's surface finish, shrinkage, and cycle time.
- Injection Speed: The rate at which the plastic fills the mold. A balanced speed ensures even filling and prevents defects like flow lines or burn marks.
- Cooling Time: The duration the part remains in the mold to solidify. This is a delicate balance; too short, and the part may warp upon ejection, too long, and production efficiency suffers. Cooling can account for up to 85% of the total cycle time.
- Clamping Force: The force holding the mold shut. It must be sufficient to counteract the injection pressure. Inadequate clamping force leads to flash, while excessive force can damage the mold.
The Impact of Automation Modern injection molding facilities are heavily automated to enhance efficiency, consistency, and safety. Robotic systems perform tasks such as:
- Loading inserts into the mold before a cycle.
- Removing the finished parts and runners from the machine.
- Performing secondary operations like trimming or stacking.
- Conducting in-line quality checks with vision systems.
This automation allows for continuous, "lights-out" operation, reducing labor costs, minimizing human error, and dramatically increasing production output. By optimizing the cycle and leveraging automation, injection molding becomes an exceptionally efficient method for mass-producing high-quality custom plastic parts.
Step 6: Finishing and Assembly of Custom Plastic Injection Molding Parts
While injection molding can produce near-net-shape parts with excellent surface finishes directly from the mold, many products require additional steps to become fully functional or market-ready. These post-molding operations, collectively known as finishing and assembly, are crucial for enhancing aesthetics, adding functionality, and combining multiple components into a final product. Planning for these secondary processes during the initial design phase is essential to ensure a streamlined and cost-effective manufacturing workflow.
Here is a breakdown of common finishing and assembly operations:
Corrective and Machining Operations
These processes are aimed at removing unwanted material or adding precision features that were not practical to include in the mold.
- Gate and Flash Removal (Degating): The gate is where plastic enters the mold cavity, leaving a small protrusion on the finished part. Flash is a thin layer of excess plastic that can form along the mold's parting line. Both must be removed. This can be done manually with cutters for small runs, or through automated fixtures, robotic cutting, or specialized ultrasonic degating for high-volume production.
- CNC Machining: This secondary machining process is used to add features with very tight tolerances that are difficult to achieve through molding alone. This can include drilling precise holes, tapping threads for screws, or milling flat surfaces to ensure perfect alignment with other parts.
Joining and Assembly Methods
Many products consist of multiple plastic components that need to be permanently joined.
- Ultrasonic Welding: This is a fast and clean assembly technique that uses high-frequency vibrations to create frictional heat at the interface between two plastic parts. The plastic melts and fuses together, creating a strong, permanent, and often hermetic seal without the need for adhesives or fasteners. It's ideal for assembling housings and enclosures.
- Heat Staking: This method is used to join a plastic part to another component, often one made of a different material like metal or a printed circuit board (PCB). A pre-molded plastic stud, or boss, protrudes through a hole in the second part. A heated tool (thermode) then melts and reforms the top of the stud into a head, mechanically locking the two components together.
- Adhesive Bonding: Solvents or adhesive agents are used to chemically join parts. This method is useful for bonding dissimilar materials or for parts with large, flat surfaces where welding may not be practical.
- Mechanical Fasteners: The traditional method of using screws, bolts, and clips. Bosses for threaded inserts or self-tapping screws are often designed directly into the molded parts to facilitate easy assembly.
Decorative and Finishing Processes
These operations enhance the visual appeal and surface properties of the part.
- Painting: Painting can be used for decorative purposes, to achieve colors not feasible with pre-colored resins, or to apply functional coatings, such as those that provide EMI/RFI shielding for electronic devices.
- Pad Printing: A versatile method for transferring a 2D image onto a 3D object. A soft silicone pad picks up ink from an etched plate and presses it onto the part, conforming to curved or irregular surfaces with high precision. It's commonly used for adding logos, text, and symbols.
- Silk Screening: This process uses a mesh screen to transfer ink onto a flat or cylindrical surface. It's excellent for applying larger graphics or text and can be used for multi-color designs, though each color requires a separate screen and pass.
- Laser Marking/Engraving: A laser is used to permanently mark the surface of a part. Laser marking changes the color of the plastic, while laser engraving physically removes material to create a deeper mark. This technique is ideal for serial numbers, barcodes, and permanent branding.
- In-Mold Decorating (IMD) / In-Mold Labeling (IML): This advanced technique involves placing a pre-printed film or label inside the mold cavity before injection. The molten plastic then fuses with the label, making the decoration an integral part of the final product. This creates a highly durable and scratch-resistant finish.

By offering a comprehensive suite of these secondary services, a single-source provider can ensure that custom plastic parts are not only molded to specification but are also fully finished, assembled, and ready for end-use, streamlining the supply chain and ensuring quality control from start to finish.
Step 7: Quality Assurance in Custom Plastic Injection Molding Parts Production
The final and most crucial step in the manufacturing process is a robust Quality Assurance (QA) program. QA is not just a single inspection at the end of the line; it is a comprehensive system of processes and checks integrated throughout the entire production journey, designed to prevent defects and ensure that every part consistently meets the required specifications. For industries where precision is non-negotiable, like medical and automotive, a strong QA system is essential for product safety and reliability.
A comprehensive QA strategy for plastic injection molding is typically built on a framework like ISO 9001:2015, an international standard for Quality Management Systems (QMS). This framework emphasizes process control, documentation, risk management, and continuous improvement.
Key Stages of Quality Assurance
First Article Inspection (FAI): Before full production begins, the first parts produced from a new or modified mold undergo a rigorous inspection. This FAI process verifies that the mold is accurate and the machine settings are correct by measuring every dimension of the part and comparing it against the original CAD model and prints. Any deviations are addressed before mass production starts.
In-Process Monitoring and Control: During production, automated systems and trained operators continuously monitor key process parameters. This includes real-time tracking of melt temperature, injection pressure, cycle times, and other critical variables. Statistical Process Control (SPC) is used to analyze this data, allowing operators to spot trends or deviations that could lead to defects and make corrective adjustments proactively.
Inspection and Testing: A multi-layered inspection protocol is used to verify part quality throughout and after the production run.
- Visual Inspection: Trained inspectors visually check parts for cosmetic defects such as scratches, discoloration, or surface imperfections.
- Dimensional Inspection: Precision measurement tools are used to ensure parts meet all dimensional tolerances. This can range from handheld calipers and micrometers for quick checks to advanced Coordinate Measuring Machines (CMMs). A CMM uses a highly sensitive probe to take precise measurements of a part's geometry in 3D space, providing an extremely accurate comparison to the design specifications.
- Functional Testing: Depending on the part's application, it may undergo specific functional tests to verify its real-world performance, such as tensile strength tests, impact resistance tests, or chemical compatibility checks.
Troubleshooting Common Injection Molding Defects
A core function of QA is to quickly identify and solve common molding defects. Understanding their causes is key to implementing effective solutions.
| Defect | Description | Common Causes | Solutions |
|---|---|---|---|
| Flash | A thin, unwanted fin of plastic that forms on the edge of a part, typically along the parting line or at ejector pins. | Worn tooling, insufficient clamp force, or excessive injection pressure. | Increase clamp force, reduce injection pressure, maintain and repair the mold. |
| Sink Marks | Small craters or depressions on the surface of a part, usually opposite a thick section like a rib or boss. | Insufficient packing pressure, short holding time, or non-uniform wall thickness causing uneven cooling. | Increase holding pressure/time, reduce the thickness of the thickest sections, or redesign for more uniform walls. |
| Short Shot | The part is incomplete because the molten plastic did not fully fill the mold cavity. | Trapped air, blocked gates, insufficient injection pressure or speed, or material that is too cold. | Increase injection pressure/speed, improve mold venting, increase melt temperature, or widen gates/runners. |
| Warping | The part twists or bends out of its intended shape as it cools. | Non-uniform cooling, premature ejection from the mold, or significant variations in wall thickness. | Optimize cooling time, adjust mold temperatures for uniformity, and design with consistent wall thickness. |
| Weld Lines | A line or seam where two fronts of molten plastic meet but fail to fuse together completely. | Low melt or mold temperature, or slow injection speed. | Increase material and mold temperature, increase injection speed, and optimize gate location to change flow patterns. |
| Burn Marks | Black or brown scorch marks on the part surface, typically at the farthest points from the gate. | Trapped air that becomes super-compressed and overheats, or an excessively high injection speed. | Improve mold venting, reduce injection speed, and lower the melt temperature. |
By embedding a culture of quality throughout the facility and utilizing a robust QMS, manufacturers can ensure that every custom plastic injection molding part delivered is a testament to precision, reliability, and excellence.
Choosing the Right Partner for Your Custom Plastic Injection Molding Parts
The success of a custom plastic injection molding project extends far beyond just the manufacturing process itself. The choice of a manufacturing partner is a critical decision that can profoundly impact everything from part quality and cost to speed-to-market and long-term project viability. A truly capable partner acts as an extension of your team, providing expert guidance and comprehensive services that streamline the entire product development lifecycle.
The Benefits of a Single-Source Provider for Custom Plastic Injection Molding Parts
In today's complex manufacturing landscape, juggling multiple vendors for design, tooling, production, and finishing can lead to a fragmented supply chain fraught with communication gaps, delays, and quality control issues. This is why partnering with a single-source, or "turnkey," provider offers a significant strategic advantage. A single-source manufacturer handles every aspect of the project under one roof, creating a streamlined, efficient, and accountable process.
The benefits of this integrated approach are numerous and impactful:
Streamlined Communication and Project Management: With a single point of contact, communication becomes clear, direct, and efficient. There is no need to coordinate between separate design firms, toolmakers, and production facilities. This eliminates the "blame game" if issues arise, as one partner is fully accountable for the entire project's success from concept to completion.
Reduced Lead Times and Faster Speed-to-Market: When design, tooling, and manufacturing are handled by different companies, significant time is lost in transit and communication handoffs. A turnkey manufacturer eliminates these logistical hurdles. The synergy between in-house design and manufacturing teams allows for rapid decision-making and problem-solving, significantly shortening the overall production lead time.
Improved Quality and Consistency: A single-source provider has complete control over every stage of the process. This ensures that quality standards are established early and maintained consistently, from raw material inspection to final assembly. When the same team that assists with Design for Manufacturability (DFM) is also responsible for building the tool and running production, there is a deeper understanding of the project's critical requirements, leading to a higher quality final product.
Significant Cost Savings: While it may seem counterintuitive, bundling all services with one provider often leads to considerable cost reductions. Turnkey providers can offer better overall pricing compared to sourcing each service individually. More importantly, this integrated approach eliminates hidden costs associated with shipping parts between vendors, managing multiple suppliers, and resolving errors that arise from miscommunication. By optimizing the design for manufacturing efficiency early on, a single-source partner helps reduce material waste and cycle times, further lowering the total cost of ownership.
Enhanced Design and Innovation: When design and manufacturing teams work in close collaboration, innovation thrives. Engineers have direct access to the realities of the shop floor, allowing them to push design boundaries while remaining grounded in manufacturability. This collaborative environment fosters creative solutions to complex challenges and ensures the final part is optimized for both performance and efficient production.
By consolidating the entire manufacturing process, a single-source provider acts as a true strategic partner, simplifying complexity and delivering a more reliable, cost-effective, and higher-quality outcome for your custom plastic injection molding project.
What to Look for in a Custom Plastic Injection Molding Partner
Selecting the right manufacturing partner is a decision that carries as much weight as the part design or material choice. An ideal partner transcends the role of a mere supplier to become an integral part of your team, contributing expertise, ensuring quality, and providing stability. When evaluating potential custom plastic injection molding partners, it is crucial to look beyond the price quote and assess their capabilities holistically.
Here are the essential criteria to consider:
1. Technical Expertise and In-House Capabilities A top-tier partner should possess deep engineering knowledge and a comprehensive set of in-house services.
- Design for Manufacturability (DFM) Support: Do they offer expert DFM analysis? A capable partner will proactively review your CAD models and provide critical feedback to optimize the design for molding, which can prevent costly defects and reduce production time.
- In-House Tooling: A manufacturer with in-house mold-making capabilities offers a significant advantage. It ensures seamless communication between the design, tooling, and production teams, shortens lead times, and allows for quicker modifications or repairs.
- Range of Equipment: The company should have a wide range of injection molding machines with varying tonnages. This indicates they can handle parts of different sizes and complexities and have the capacity to scale production as your needs evolve.
2. Robust Quality Management Systems (QMS) Quality should be embedded in the company's culture and processes.
- ISO Certifications: Look for a manufacturer certified to ISO 9001:2015, which is the international standard for a QMS. This certification demonstrates a commitment to consistent quality, process control, and documentation.
- Industry-Specific Certifications: If you are in a regulated industry, your partner must hold the relevant certifications. This includes ISO 13485 for medical devices or IATF 16949 for the automotive sector.
- Inspection and Metrology: Inquire about their quality control lab. Do they use advanced inspection equipment like CMMs (Coordinate Measuring Machines) for precise dimensional verification? Do they have a documented process for first article inspections, in-process checks, and final inspections?
3. Experience and Industry Specialization An experienced partner brings a wealth of problem-solving knowledge to your project.
- Proven Track Record: How long have they been in business? Can they provide case studies or references from customers with projects similar to yours?
- Industry-Specific Knowledge: A partner with experience in your industry will already be familiar with its unique challenges, material requirements, and regulatory standards. This specialized knowledge is invaluable and can prevent unforeseen compliance issues.
4. Project Management and Communication Clear, proactive communication is the cornerstone of a successful partnership.
- Dedicated Point of Contact: Does the company assign a dedicated project manager to your account? Having a single point of contact ensures that your questions are answered promptly and that you are kept informed throughout the project lifecycle.
- Transparency: A trustworthy partner is transparent about their processes, timelines, and pricing. They should be able to clearly outline all costs, including tooling, materials, and any secondary operations.
5. Scalability and Full-Service Offerings Your partner should be able to support you as your business grows.
- Volume Flexibility: Can they handle everything from low-volume prototypes and pilot runs to high-volume mass production? This flexibility prevents you from having to switch suppliers as demand for your product changes.
- Value-Added Services: Look for a partner that offers a full suite of services beyond molding, such as part assembly, decorating, custom packaging, and inventory management. This consolidates your supply chain and simplifies logistics.
Choosing a manufacturing partner is a long-term strategic decision. By thoroughly evaluating potential suppliers against these criteria, you can find a partner who will not only produce high-quality parts but also contribute to the overall success and profitability of your product.
Impact of Technology and Automation on Custom Plastic Injection Molding Parts
The plastic injection molding industry is in a constant state of evolution, driven by advancements in technology and automation that are revolutionizing efficiency, precision, and capability. These innovations are reshaping the factory floor, moving from traditional manufacturing methods to highly optimized, data-driven operations. For companies seeking custom plastic parts, partnering with a manufacturer that embraces these technologies is key to gaining a competitive edge.
Automation: Enhancing Precision and Productivity Automation is one of the most visible and impactful advancements in injection molding. Robotic systems are now integral to many stages of the production process:
- Part Handling: Robotic arms can remove parts from the mold with a level of speed and consistency that manual operation cannot match. This automated handling minimizes the risk of damage to delicate parts and ensures a steady cycle time.
- In-Mold Operations: Robots can precisely place inserts (such as metal threads or electronic components) into the mold before injection or apply labels for in-mold decorating (IMD).
- Downstream Processes: Automation extends beyond the molding machine to include trimming gates, assembling components, performing quality checks with vision systems, and packaging finished products.
The benefits of automation are profound. It leads to significantly higher production rates, reduces labor costs, and, most importantly, improves quality and reliability by minimizing human error. Automated systems can operate 24/7, enabling "lights-out" manufacturing and dramatically increasing overall equipment effectiveness.
Industry 4.0: The Advent of the Smart Factory Industry 4.0 represents the fourth industrial revolution, characterized by the integration of digital technologies into manufacturing. In injection molding, this translates to a "smart factory" where machines, sensors, and software are interconnected.
- Internet of Things (IoT): Sensors embedded within the molding machines, molds, and auxiliary equipment collect vast amounts of real-time data on parameters like temperature, pressure, cycle time, and energy consumption.
- Big Data and AI: This data is fed into Manufacturing Execution Systems (MES) where artificial intelligence and machine learning algorithms analyze it to identify patterns, predict maintenance needs, and automatically optimize process parameters. This predictive capability reduces unplanned downtime and ensures the process stays within its optimal window.
- Digital Twins: Manufacturers can create virtual replicas of their production processes. These "digital twins" allow for simulation and validation of changes without interrupting actual production, accelerating process optimization and operator training.
Scientific Molding: A Data-Driven Approach to Quality Scientific molding, also known as decoupled molding, is a disciplined, data-driven methodology for developing a stable and repeatable injection molding process. Unlike traditional molding, which often relies on machine settings, scientific molding focuses on the plastic's behavior from the material's point of view. It separates the process into distinct stages—filling, packing, and holding—and optimizes each one based on empirical data from in-mold sensors measuring pressure and temperature.
The core benefits of this approach are:
- Consistency: It minimizes shot-to-shot variation, resulting in highly consistent part quality and dimensional stability.
- Efficiency: By establishing a robust process window, it reduces scrap rates and shortens cycle times.
- Troubleshooting: With a well-documented scientific process, troubleshooting becomes much simpler. Technicians can quickly identify what has deviated from the standard and correct it, rather than relying on trial and error.
Together, automation, Industry 4.0 principles, and scientific molding are elevating the capabilities of custom plastic injection molding. They enable the production of more complex parts to tighter tolerances, with higher quality, and at a greater efficiency than ever before. Choosing a manufacturing partner invested in these advanced technologies ensures access to a more precise, reliable, and forward-looking production process.
Conclusion
In conclusion, custom plastic injection molding is a powerful and precise manufacturing method crucial for developing high-performance, reliable plastic components across a vast spectrum of industries. Its ability to produce complex parts with high repeatability and at a low cost-per-unit for large volumes makes it an indispensable tool for modern product development.
By understanding the intricacies of the comprehensive seven-step process—from the critical Design for Manufacturability (DFM) phase and strategic material selection to the precision of tooling, production, finishing, and robust quality assurance—companies can transform a concept into a tangible, market-ready product. Embracing this detailed methodology is key to achieving exceptional custom plastic injection molding parts that meet exact specifications and drive innovation. Furthermore, the selection of a knowledgeable and technologically advanced partner, particularly a single-source provider, streamlines this complex journey, ensuring synergy, reducing risks, and ultimately leading to a more successful outcome.
We hope this guide has provided you with a thorough understanding of the world of custom plastic injection molding. We encourage you to share this article with your network and to apply these insights when planning your next project. Your next great product deserves the precision and efficiency that this process, when expertly executed, can deliver.